
Ever considered merging multiple WordPress websites into one super-site?
Perhaps the stress of maintaining multiple sites is finally getting the better of you, or perhaps you simply want to focus all your energy and attention on growing one brand.
Whatever your reasons, the good news is that merging content from your sites isn’t a difficult process.
As you’ll see in this guide, it’s mostly a matter of:
- Deciding which site stays and which ones go
- Deciding which content to migrate
- Migrating that content using a plugin
- Setting up 301 redirects to help users find relocated content
- Testing that everything works properly.
Below, you’ll learn how to carry out each of these steps without negatively affecting the SEO gains you’ve worked so hard to build up across your WordPress portfolio.
Benefits of Merging Multiple WordPress Websites
Simplified Management
Let’s start with the most rational and logical reason first:
Managing one WordPress site is easier than managing two websites.
The more sites you operate, the more time it takes to maintain them and the more energy you have to invest in growing them.
Imagine no longer spending four hours a week on one site and four hours on another, but instead investing eight solid hours on managing one website. Wouldn’t that give you a lot more time to wrap up WordPress maintenance tasks and focus on proper growth?
Enhanced SEO Performance
Say you run three separate blogs on related but not identical topics.
For example:
A. Financial planning
B. Stock market trends
C. Personal finance software,
Site A, a financial planning site, is on fire, sending strong E-E-A-T signals to Google and reaping the rewards in terms of high traffic and paid newsletter sign-ups.
The other two blogs…not so much.
Sure, a few articles have enjoyed relative viral success, but that success hasn’t translated to the same overall SEO gains as the financial planning blog.
This is where merging sites can help boost your WordPress SEO, combining the biggest traffic drivers of your underperforming blogs with the high domain authority and user trust of your top performer.
What’s more, merging content itself removes you as your own competition in the rare instances when two or more sites target similar keywords.
For example, publishing a review of a financial planning app on sites A and C means you’re essentially dividing the audience interested in reading about that app.
Depending on the particular search term they used, half might go to site A and the other site to site B, meaning only 50% of the potential audience for that review ends up on any one site.
Focusing on one review on one website means you’re no longer sacrificing one site’s traffic for the sake of getting visitors to another.
Cost and Resource Efficiency
Hosting, domains, multi-site licenses for themes and plugins, it all adds up, especially when you’re running multiple websites.
True, merging multiple websites may mean you need to reevaluate your hosting needs and possibly upgrade to a bigger plan, but for most users, it’s fair to say that running one website costs less than running two or more.
“But hosting costs isn’t an issue for me,“ you argue. “I host all my websites on a single hosting plan.”
In that case, all the more reason to merge.
You’re essentially running three WordPress installations, three sets of plugins, and three WordPress themes all on one server. We don’t know what your current performance metrics look like, but we’d be willing to bet they’d improve with one installation, one theme, and one set of plugins.
Improved Content Organization
Fewer sites means less content to create and manage. Merge your sites, and you’ll find that many common multisite content challenges either disappear or at least get a whole lot easier.
For example, it takes less time and effort to:
- Keep tabs on who’s writing which article
- Monitor the status of posts and other content assets such as videos and images
- Maintain a well-organized media library
- Provide users with easy access to valuable content via a centralized search.
Pre-Migration Checklist
So, those benefits were more than enough to convince you that a website merger is the right move and now you’re eager to get started.
That’s great, but before you begin, there’s a few things you need to take care of if you want this process to be as smooth and successful as possible:
Backup All Websites
When all goes well -which it does 99.9% of the time- migrating content from one website to another is straightforward and problem-free.
The other 00.01% of the time that it isn’t?
It can be a time-consuming pain in the neck to put right, especially if you don’t have a backup copy of your site that you can quickly restore in a worst-case scenario.

So, before your merger officially begins, cover yourself for all possible outcomes by creating a backup copy of each and every website you’re bringing together.
Using a tool like UpDraftPlus, you can even send backups of each site to the same folder on a cloud storage platform, making them easier to find later on.
Do so, and you can be confident that one wrong slip during the migration process won’t make your content disappear forever.
Not that this is the only advantage. Backups also help with:
- The initial migration process – UpdraftPlus and other plugins such as BackupBuddy offer both backup and migration features. Having a copy of your website created by the same tool you’re using to migrate it means fewer concerns about compatibility.
- Growing your site long-term – You may decide not to migrate all of your content at once. It might be that you’re only uploading your biggest hits, to begin with, or perhaps starting out only with those posts that can help you build up a new content hierarchy within your site.
The backups you create will essentially keep that old, no-longer published content safe and accessible until it’s time to resurrect it on your new super site.
Conduct a Content Audit
With your backups securely stored away, it’s time to go through each site’s content with a fine-toothed comb, ridding yourself of redundant or similar posts and making informed decisions about each piece.
Ask:
- Is this content relevant to the new site?
- If yes, does it need cleaning up or improving before being migrated?
- If so, what improvements does it need?
- Updated text?
- Repaired broken links?
- New information?
- Who will make those improvements?
Of course, if you answered ‘no’ to that first question regarding relevancy, that’s a good sign that the content doesn’t need to be migrated. Having lots more content won’t do you as many favors as you might think if most of that content isn’t relevant to your primary site’s audience.
Website Structure & URL Mapping
Now you know which content you’re bringing across, it’s time to decide where it will fit.
First, figure out a new structure for your merged content.
- Do you need new sections?
- How will those sections fit into your overall structure?
- How will they be incorporated into your site’s navigation? #
- Will the migrated content sit under existing categories and tags, or do you need to create new ones?
Next, carry out a URL mapping exercise whereby old URLs on your secondary sites are mapped to new URLs on your primary site. That way, you ensure that content is well-organized right from the start, with little to no impact on user experience and search rankings.
Handling Duplicate Content
Conducting a content audit across multiple sites may have revealed a few instances of identical content or content that simply covers identical topics.
You’ll want to tackle these, and any others that occur, in order to avoid the kind of duplicate content issues that can confuse search engines and users alike.
To do that, use a platform like Copyscape to identify duplicate pages or posts across your websites.
From there, you can begin to make decisions about what should be kept and migrated, and what should be discarded.
It might be that one post is clearly stronger than the other. In that case, it’s obvious which post stays.
However, it may also be that both pieces have their strengths, in which case you can consider combining the best bits of both into one stronger article.
Identify Common Features and Plugins
Next, it’s time to consider the plugins and tools used to deliver content, and how they’re going to align on your new site.
If you’ve used the exact same plugins on all of your sites, this may not be an issue. You can simply migrate the content and trust that it’s going to work.
For example, if you rely on shortcodes and use the same plugin to manage them on each site, those shortcodes will work correctly on the new site.
However, if you’ve used one shortcode manager on Site A and a different one on Site B, shortcode content imported from A won’t work on B.
In that scenario, you have a decision to make:
- Recreate the shortcode generated content with Site B’s plugin to avoid unnecessary bloat or;
- Import Site A’s shortcode plugin or use an alternative if Site B doesn’t offer the same features.
Choose a Primary Domain
Finally, it’s time to determine which site is your primary domain and which site, or sites, are your secondary domains.
Your primary domain is the one site that will remain post-merger. It’s the one you’ll be migrating your content to.
Your secondary domains are those other websites that you’ll delete or change after merging. They’re the ones you’ll be migrating content from.
If one site has a significantly higher domain authority or much greater traffic volumes than the others, then that site is perhaps an obvious choice for your primary domain.
But what if all your sites are fairly evenly matched?
In that case, you may need another way to decide:
- Which site is your main focus and/or passion? – Perhaps you’re tired of writing about the stock market and software reviews and just want to focus on financial planning. Migrating content to the planning website gives you the benefits of your other content, while making it easier to focus on the kind of content you enjoy most.
- Which site offers the best user experience? – Is there one site that clearly has better design, faster performance, and clearer navigation than others? If so, that’s a top contender for your primary site.
Step-by-Step Guide to Merging Multiple WordPress Websites
Step 1: Install a Migration Plugin
Along with the aforementioned UpdraftPlus, there are a number of top WordPress migration plugins you could use for this process, including:
- Duplicator
- All-in-One WP Migration
- WPVivid
- WP Staging
And more.
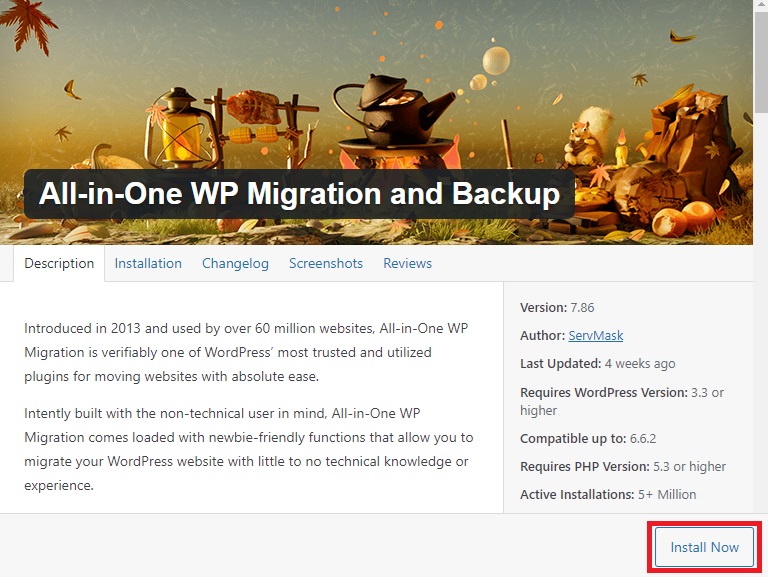
For this tutorial, we’re working with All-in-One WP Migration.
Whichever tool you prefer, begin by installing it on your primary site and all the secondary sites that you plan to merge.
Step 2: Export Content from Secondary Websites
Next, go to each of your secondary websites in turn and open your migration plugin.
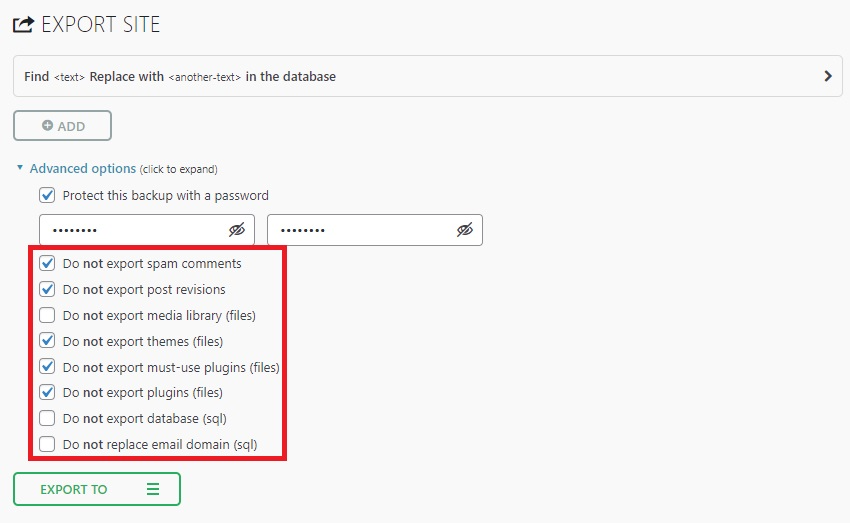
Access the Export settings, and use the options to ensure that you’re only exporting your content, not your entire website.
Not only is a full site export more time-consuming, but it may be unnecessary. If your secondary sites have features that aren’t supported by existing plugins on your primary site, then sure, you’ll need to move those across, but otherwise, you can save time and space by leaving them out.
You can also save on server resources and ensure your merged site is clutter-free by excluding post revisions and spam comments from your export.
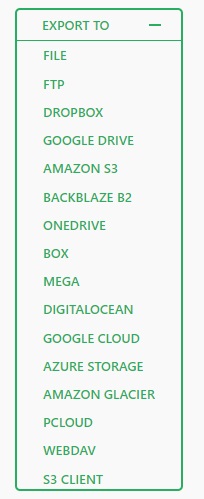
After configuring these settings, click Export To and choose where your exported content will be stored and saved. That could mean simply downloading it to your device, or it could mean sending it to your cloud storage account.

Confirming your storage preferences activates the export process. As said process gets underway, repeat these steps with your other secondary blogs, or, better yet, go grab a well-earned cup of coffee.

When you get back, you’ll find that copy of your website content ready for you to either download or access via your cloud account.
Step 3: Import Content to the Primary Website
Once you’ve got all of your exports ready, head back to your primary website and select Imports in your migration plugin.
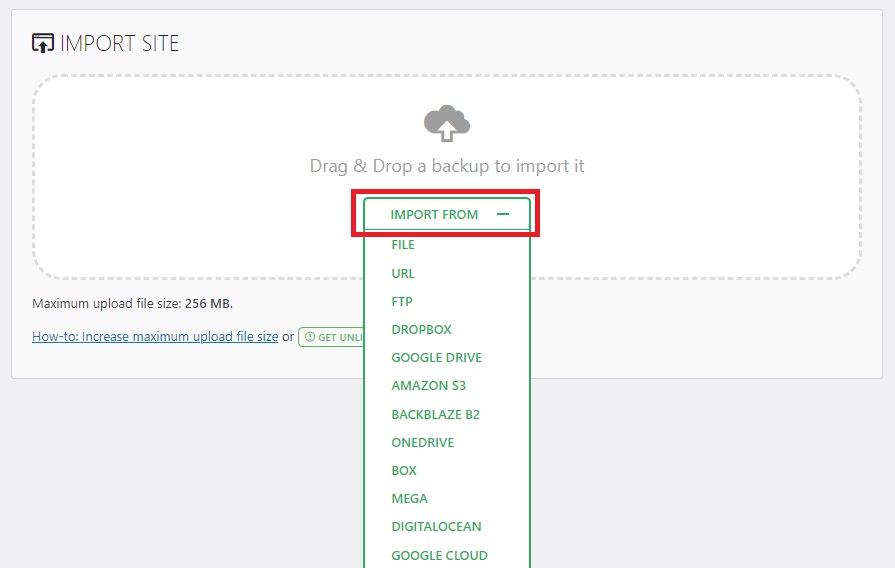
Select the exported copies of your secondary website and import them into your site.
A. Take Note of Files That Failed to Import
If you’ve followed these steps to the letter, everything should have gone smoothly, but it’s not entirely uncommon that some files will fail to upload to your new site. This could be because the file was too large or corrupt to begin with, because of a plugin or theme conflict, or simply due to different settings on the two sites.
Whatever the reason, your first post-import task is to make note of any failed file imports and manually copy them across to the new site.
B. Check Authors Are Assigned Correctly
Are the correct writers credited as authors of each post?
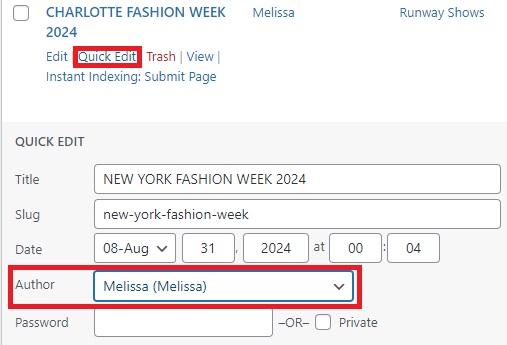
One easy way to check this is to use the Quick Edit options underneath each piece of content listed in the Posts and Pages menu.
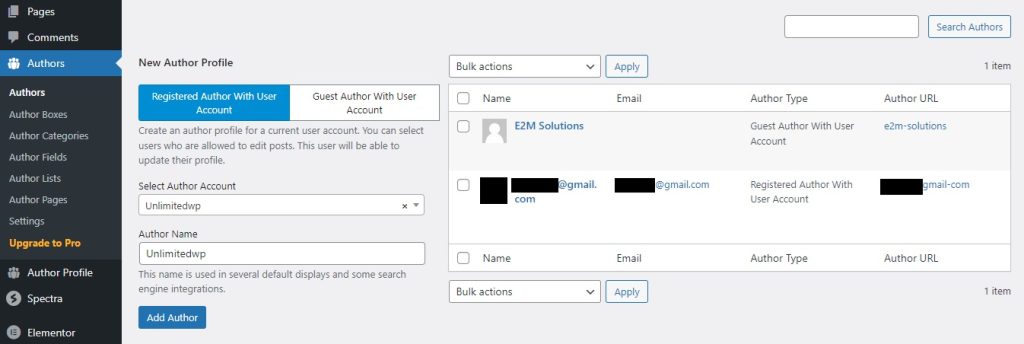
If your site merger means bringing on lots of new content creators, you may find it easier to add them to your site using the Authors WordPress plugin before ensuring all posts are assigned correctly.
C. Check Files and Categories are Correct
Again, you can use the Quick Edit feature for this.

Check that categories and tags were imported properly and that each newly imported post is organized correctly.
D. Evaluate Your Content
Do your text, images, and other elements look as they should? Don’t take it for granted that they will be, especially if your primary site uses a different theme or page builder than your secondary sites.
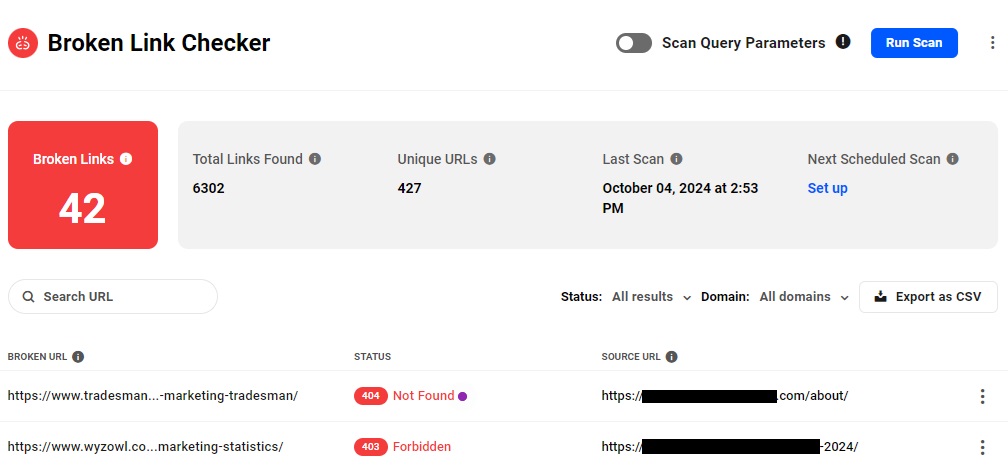
Test that each piece of content looks correct on multiple devices and use tools such as Broken Link Checker to test both internal and external links.
Step 4: Set Up 301 Redirects
With your content in tip-top condition, it’s time to make sure people can find it by directing people away from your secondary sites and towards your primary one.
To do that, you’ll need to set up 301 redirects by editing the .htaccess file on your secondary sites.
301 redirects tell search engines that content has been permanently moved to a new location, making them vital for a few key reasons, including:
- Maintaining search rankings
- Avoiding broken links
- Ensuring regular visitors to your old sites can still find what they’re looking for.
Here’s how to set them up:
A. Find Your htaccess File
You’ll normally find this file in the root public_html directory of your WordPress site.
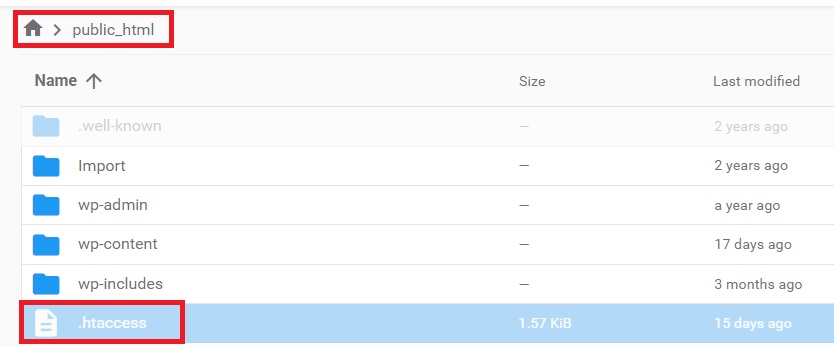
You can access it either via an FTP client or your WordPress hosting company’s file management tools.
B. Edit Your htaccess File
Once you’ve found your htaccess file, open it, and paste the following code snippet at the top, replacing *yourmainsite* with your actual domain:
#Options +FollowSymLinks
RewriteEngine on
RewriteRule ^(.*)$ http://www.yourmainsite.com/$1 [R=301,L]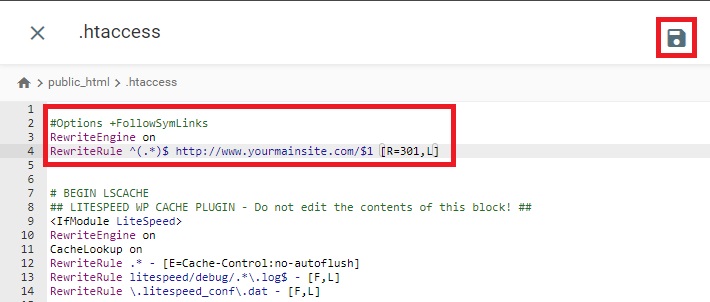
Step 5: Merge User Accounts (if applicable)
Confirming your post authors were correct in Step 3 may have revealed a bigger user account issue to contend with:
An overabundance of users and roles.
For example, it could be that some team members had multiple roles across different sites, meaning they’re now listed multiple times in your user list.
All that extra user data may have a slight impact on site performance, but more importantly, it’s going to make managing roles and accounts a lot more complicated.
To fix that problem:
Cross-reference user lists: Compare the user lists of all websites involved in the merge. Look for users with the same email addresses or usernames.
From there, you can either delete those accounts and create new ones with the correctly prescribed roles and credentials, or you can use the WP User Merger plugin to combine user accounts.
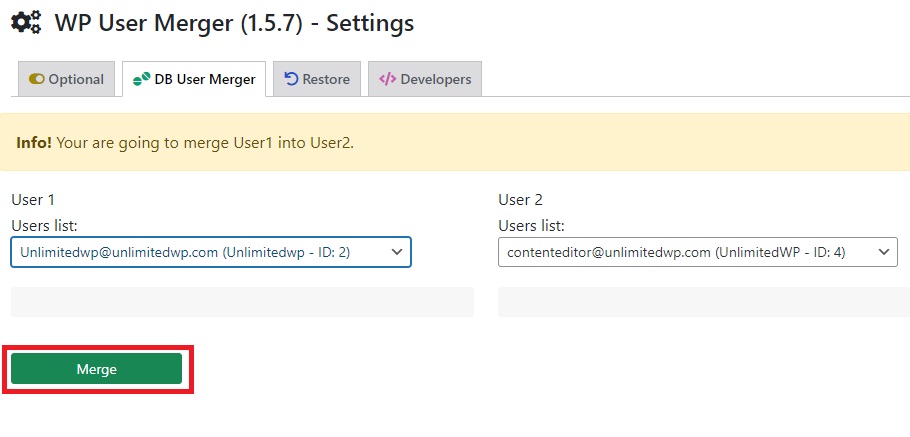
Simply select two accounts and hit merge.

Confirm the action, and let the plugin do its thing.
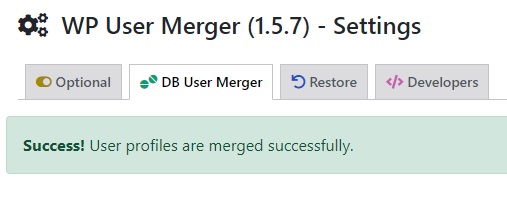
When it’s done, both accounts have been rolled into one, making them easier to manage.
Step 6: Test Everything Before Going Live
You’re almost ready to reveal your new super site to the world, but before you do, it’s time to test that everything looks and functions at its best.
After all, could you imagine how embarrassing it would be -not to mention devastating for your business- if you were to announce your site merger only for visitors to find the finished product doesn’t work correctly on their device?
With that in mind, test at least all of the following before making your site public again.
- Are all links working and going to the correct location?
- Does the site deliver the same positive user experience on all devices and browsers?
- Has your migration caused performance issues that need to be addressed?
- Do contact forms and other features work as expected?
Step 7: Go Live
Everything tested? Any problems resolved? Great.
Then it’s time to remove maintenance mode or bring your successfully merged site out of staging and into the live environment before giving yourself a pat on the back for a job well done.
Post-Migration Steps to Ensure Success
Don’t get too carried away with the celebrations just yet. Your primary site may be live, bigger and better than ever, but there’s still a handful of post-migration tasks you need to tackle if you want to be confident of long-term success:
- Reconfigure SEO Plugins – Adjust settings in your SEO plugins to reflect the new website structure and URL changes. This will help search engines understand the merged content and maintain rankings.
- Update Google Analytics and Search Console – Ensure tracking codes and sitemaps are up-to-date, with your analytics tools fully set up to monitor content on the new site.
- Inform Users and Subscribers – Use your email marketing, social media, or whatever communication channels you normally work with to tell users of your secondary sites about the new change. You may also want to think about replacing those sites with a simple landing page that tells visitors where to find your content.
Successfully Merging Multiple WordPress Websites: Key Takeaways
Merging multiple WordPress websites is a prime example of where less truly is more.
The fewer sites you have, the less time, effort, and money you have to spend on each one, allowing you to focus all your resources on growing one platform.
That’s not to mention the added benefit that all the extra content will bring to both your users and your long-term SEO game.
Perhaps the best part is that it’s such a simple process, involving just a few key steps:
- Export and Import Your Content – Back up content from your secondary site and import it into your primary site.
- Test, Check, and Evaluate – Ensure user roles and categories are correct, that content looks right and that features function correctly.
- Configure redirects and go live – Use the htaccess file on your old sites to direct traffic to your primary site, creating a hassle-free transition for you and your users.
Ready to merge your sites but don’t have the time to do it yourself? Book a call to learn how our white-label WordPress agency can do all the work for you.
FAQs for Merging Multiple WordPress Websites
Do I have to use a plugin to merge multiple WordPress sites?
No, you can also use the export/import features that come with WordPress. You’ll find them under Tools.
What is the best time to merge websites?
The best time to merge sites is during the least active hours of your primary website. If your traffic is lowest during the evening hours or at the weekends, for example, do it then. That way, you’ll minimize disruptions for your end users.
How long does it take to merge WordPress websites?
That depends on how much content you’re migrating over. While the process itself is straightforward, large amounts of content mean longer export and import times, not to mention more work on testing, optimizing, and redirecting.